- Create a new folder on your desktop, name it (PhoneBook).
- Open your Visual Basic 6.0, create new (Windows Applicatio).
- Save As .... your project in your (PhoneBook) folder on Desktop with the name (MyPhoneBook), or before saving, from (Project) , (Project Properties) , (General Tab) , (Project Title : MyPhoneBook) then from (Make Tab) , (Application Title : MyPhoneBook) then click (OK).
- Save As .... your [Form1] from (Project Panel) in the same folder with the name (MainFrm), and go to the (Properties Panel) and change the Name property of the Form1 to (MainFrm). Close your project.
- Your folder (PhoneBook) now should look like this
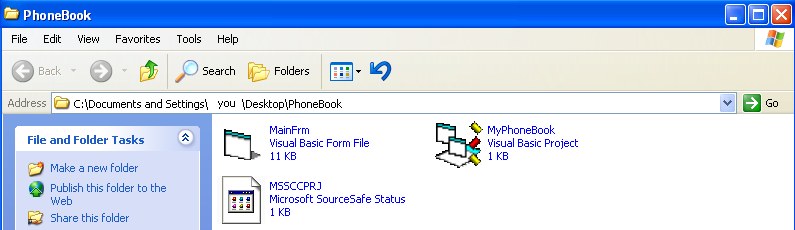
Folder (PhoneBook)
- Now re-open the project and follow the following photo with notes on the design :
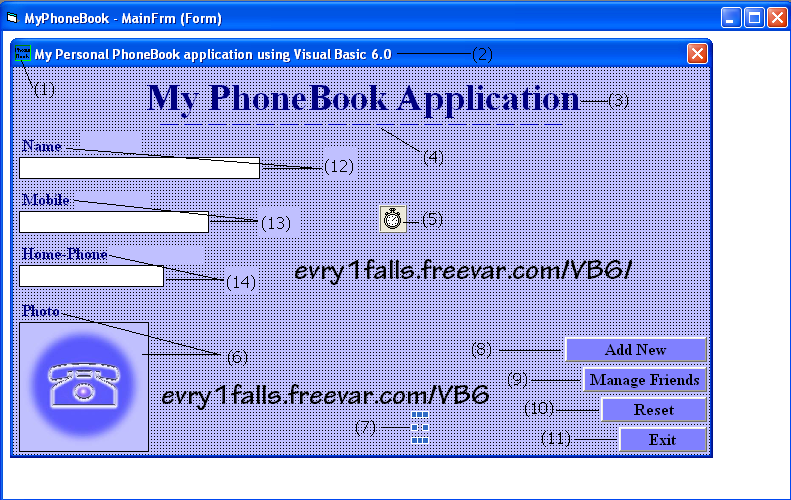
[MainFrm] form with controls placed on it, see the notes below.
- Notes - numbers mark on the photo represent the following controls :
(1) Icon of the project : Created using VC++ and it is 32x32 Pixels, you will find it in the source code of the project in the end of the tutorial. We set the Icon of the project using the Main Form's Icon, from its [Icon] property, after putting the Icon file (Phone.Ico) in the main project folder (PhoneBook), Or we can set the form's Icon using this code :
(2) The (Title Bar) : Of the form (MainFrm), it can be sat using the [Properies Panel] from (Caption) property, or by the code like this :
(3) Label2 : Just a design for the form as a head-line,we drag it on the form's surface wherever we want, but also we can control its (ForeColor, FontSize, FontName) properties using the Properties Panel or using the code like this :
(4) Line1 : Is a graphic control grabbed from the Tools Panel and dropped on the form to define a straight line or just a boundry to something, in this case ; it's just a line to define the Head-line, it also could be put on a form using the code like this :
(5) Timer1 : Is a control and can be found among the controls on the Tools Panel, Timer properties can be sat from Properties Panel of with code, we only care about two properties (1\ Enabled=True & 2\ Interval=1000)
(6) Timg & Label5 : Timg is the name of our Image control, once we place it on the form we can resize it as in the screenshot above to fit its place, we set its property (Strech=True) and propert (Picture='Any picture JPG in the main folder, as you will see, I created one for it and will be found in the source code at the end of this lesson.'). The label5 condition is similar to Label2. Note : The Picture displayed already in the Image control represents the default picture that will be saved in the database table, if no other pictures needed to be assigned to a friend's photo.
(7) LblTime : a Label control and will be used to display the current Date & Time on the form [MainFrm]. It derives its functionality from Timer1 control. If you wish to display the current Time & Day of your MS Windows using Visual Basic 6.0, you can use this code
(8) CmdSave : Is a CommandButton control, can be found on the Tools panel and we drag those CommandButtons because we will use them to execute VB6 command lines with them. CmdSave is the [Caption] property of the CommandButton, while "CmdSave" is the [Name] propert of it. We will use this button to save the data entered on the form into the database. [Style] property is set to (1- Graphical) to enable us to activate the [BackColor] property of the CommandButton(s).
(9) CmdShow : Another CommandButton, we will use it to access the other form we will create in the future to manage [Edit \ Delete] friends.
(10) CmdRes : CommandButton that is used in our project to reset the data entered on the form or clear the TextBox controls from all the data enetred, in order to Cancel or Add New entry.
(11) CmdEnd : A CommandButton is used to terminate/exit the application and its all opened forms.
(12) Label1 & Tnm : Label1 is a label control, its [Caption] property is "Name"and is used to define the TextBox control [Tnm] as the name of the friend while "Tnm" is the value of the property [Caption], means that in the following TextBox called [Tnm] we will write the name of the friend we wish to save in the database. "Tnm" is the [Name] property of the TextBox control and [ForeColor] property is set to "Blue", [Font] property is set to "Times New Roman, Bold, 11" and so is all the TextBoxes . The value of the [Text] property (What we write in the TextBox) of the TextBox control is what will be saved to the database table in the corresponding Table Field .
(13) Label3 & Tmob : Those are also a Label and a TextBox control used to enter the mobile number. Remeber that you can always set the location of all the controls on the form using the code or using the mouse.
(14) Label4 & Thp : Another Label and TextBox controls placed on the form [MainFrm] to show the place of where we will enter the home-phone of the friend, and they use the same design property as the previous 2 sets 12,13.